How to Enable Google Assistant on Any Android Smartphone (No Root)

Google Assistant arrived with Google’s Pixel smartphones and Android fans have been waiting for the voice assistant to arrive on their Android smartphones ever since. Well, Google recently confirmed that they are rolling out Google Assistant to almost all Android smartphones running Android 6.0 Marshmallow or higher. However, the rollout has been pretty slow and people are still waiting for the Google Assistant to arrive on their smartphones. As you might have guessed, there is a workaround if you cannot wait for Google Assistant to arrive on your smartphone officially. Here are the steps to enable Google Assistant on your Android smartphone without root access
Enable Google Assistant Through Beta Apps
Note: I tried this method on the Moto G4 Plus, Lenovo Phab 2 Pro, LeEco Le Max 2, and Galaxy S7 and it worked out fine.
1. Firstly, you will have to get the beta versions of Google Play Services and the Google app. To do this, head to Settings->Google, tap on the three-dot menu button on the top right and then, tap on “Help & Feedback“.

2. In the “Help” page, tap on the three-dot menu button and tap “View in Google Play Store“. This will expectedly open up the Play Store page of Google Play Services. Here, you can just scroll down and tap on the “I’m in” button in “Become a beta tester” section.

3. Then, tap on “Join“, after which the beta signup will be in progress. It should take a few minutes. It took me around 5 minutes, but your mileage may vary.

4. After that, search for the Google app in the Play Store and sign up for its beta program as well.

5. Once done, wait for a few minutes and then, open up Play Store. Here, head to the “My apps & games” section and go to the “Beta” tab, where you will find Google and Google Play Services. Just make sure to update both of them.

6. After the apps are updated, head to Settings->Apps. Here, go to the Google->Storage->Manage Space and tap on “Clear All Data“.
7. Then, go back and do the same for Google Play Services. Tap on “Manage Space” and “Clear All Data“.
8. Once you are done, open up the Google app, where you will be asked to set things up. Once done, you will see the app familiar Google page. Don’t be disappointed, open up the hamburger menu and tap on “Settings“.
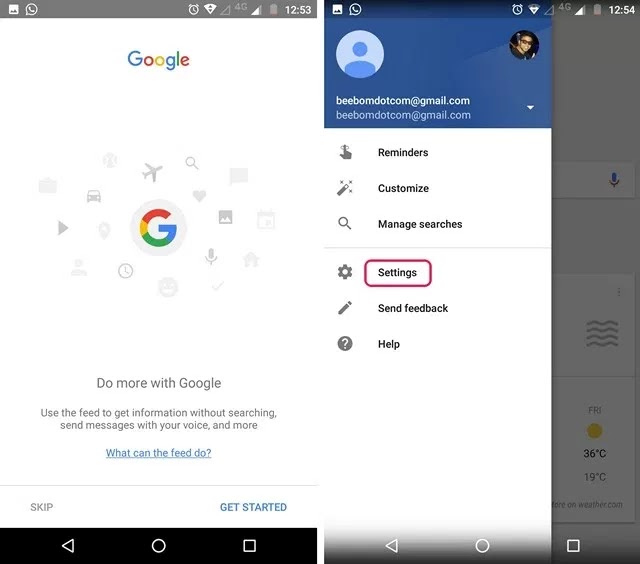
9. Here, you will find the Google Assistant settings. Just tap on it. The Google Assistant setup window should then pop-up. You can tap on “Continue” and then, press hold the home button to trigger the Google Assistant.

That’s it. The Google Assistant will now be available to you. You can just ask the Assistant “What can you do” and it will bring up a list of things it can do. You can use the voice assistant to set reminders, get news, check the weather, get various info or even play games. If you’d like to do more with the Google Assistant, you can check out our detailed article on Google Assistant tricks.
SEE ALSO: Siri vs Google Assistant vs Hound: Who Wins?
Get Google Assistant on Your Android Smartphone
Well, that was pretty easy, right? So, try out these steps and get the cool new Google Assistant on your Android smartphone. Do keep in mind that the method only works on Android 6.0 or higher. Well, if you have any doubts, do let me know in the comments section below.

By
Husain Eliyas
Comments
Post a Comment